


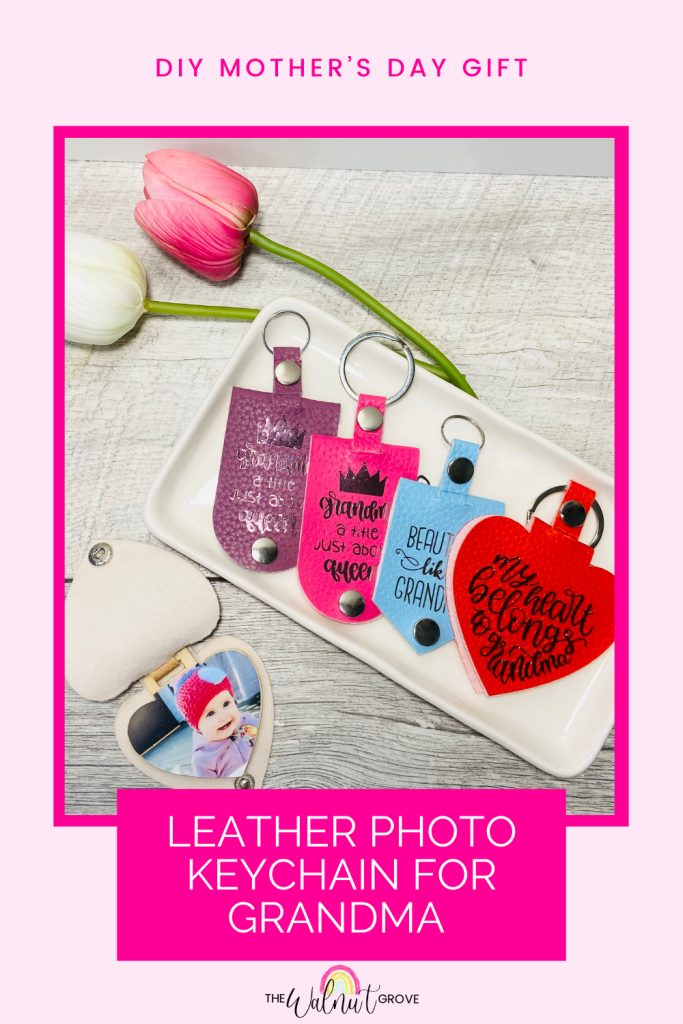
This personalized leather (or faux leather) keychain is the perfect DIY Mother’s Day gift for grandma! What grandma doesn’t love a cute photo of a grand baby and a catchy saying? This keychain is easy to make and is so sweet. Choose from three designs and customize it with your choice of text, photos, and colours. Make this keychain with your Cricut Maker today.


Mother’s Day has always been synonymous with crafting to me. I have been making and DIYing my mom’s Mother’s Day gifts since as long as I can remember. This year I wanted to make her something featuring my kids, as they are her first grand babies.

While coming up with ideas I thought to myself “what grandma doesn’t love looking at her grandkids and showing them off all the time?”. I know we are in the age of technology, but nothing beats an actual, physical photo.

So fire up your Cricut Maker and let’s uphold the crafty Mother’s Day tradition with something special!
Let’s Jump Into the Tutorial
Materials/Supplies
- Faux Leather or leather – I bought this set from amazon
- Snap fasteners – I bought this set from amazon
- Rivets – I didn’t end up using them because mine were too long. I just used more snaps and they worked fine
- HTV/Iron on vinyl – I used Strong Bond Metallic Everyday Iron On by Cricut
- Basswood or Balsa – any thin wood less than 2.4 mm thick that your Cricut maker can cut (I used 1/16″ basswood)
- Keyrings
- Photos
- Mod Podge – I used the hard coat Mod Podge
Tools/Equipment
- Cricut Maker
- Knife Blade
- Weeding Tool
- Strong Grip Cutting Mat
- Painter’s Tape/Masking Tape
- Iron/Easy Press
- Towel/Pressing Mat
- Craft Knife & Cutting Mat (optional)
- Sand paper/sanding block
- Scissors
- Paint Brush
- Leather punch
- Hammer
- Tool for attaching the snap fasteners/rivets
- Scrap wood – or something to put under leather when attaching fasteners

Step 1 – Plan your design
I created these keychains in Cricut Design Space and that file is located here:
Feel free to change up the iron on designs for whoever you’re making the keychain for. Maybe it’s for Nanna, or maybe you’re making it as a gift from you to your mom, either way this keychain is fully customizable.
Step 2 – Cut out the wood photo plaque
Put your basswood or balsa onto your strong grip mat. Make sure that the piece of wood is no wider than 11″. Cricut gives their specifications here.
Apply painter’s tape or masking tape around the perimeter of the wood to make sure it stays put during the cut.

Move all your white star wheels all the way to the right so that they don’t indent the wood.

Make sure your knife blade is installed. I recommend using a fresh blade if yours is dull. I had to change mine.
Set the correct material in design space, and let the Cricut do the work for you. You may need to do extra passes at the end to make sure the Cricut cuts through. I had to do several extra passes, but this may be due to the wood I used.

Now you should have several pieces like this, depending on the design you chose:

The edges may need a light sanding to smooth them.

Step 3 – Cut out the leather pieces
Switch back to a fine point blade, or whatever blade the Cricut suggests for the material you’re using. I used faux leather, so the Cricut suggested a fine point blade. I kept my star wheels to the right to avoid any indents on the leather.
Put the faux leather good side up onto your cutting mat. Mine left a residue on my mat – so if you want to avoid that you could use tape on the fuzzy side of the leather to remove some of the fuzz before applying it to your mat.

Set the material in Cricut Design space and cut out the leather pieces.

When the Cricut is done cutting, remove your design – you may have to pull gently on the leather pieces for them to come free.

If your leather had a fuzzy side you may need to carefully trim off the excess with scissors.
Step 4 – Cut out the iron on vinyl
Put your iron on vinyl shiny side down onto your cutting mat. Move your star wheels back into place.

Set your material to iron on vinyl, mirror the design and cut it out.


Weed out the background from the design.


Step 5 – Iron the vinyl onto the leather
Preheat your iron or Easy Press.
I used the Easy Press 2. Cricut recommends setting the temperature to 285 degrees Farenheit, doing a 5 second preheat of the material, then pressing for 30 seconds with light pressure for faux leather. Their full heat guide can be found here.

During the preheat, I ironed my two pieces in place so that there would be a slight crease on the top of the keychain.
Make sure to carefully line up your design before pressing.

After your design is applied, let the carrier sheet cool before removing.


Step 6 – Cut your photos to fit the wooden plaque
I printed my photos onto 4×6 sheets using my Canon Selphy printer.

To get the sizing correct, I used an app called Pic Stitch. This app allows you to make a collage. I chose a collage with 8 even sections and set the aspect to 6×4.


This sized the photos really well for the little plaques, but you can use whatever photos you have.
For the heart shaped plaques I used the same app to create the collages, but instead divided my 4×6 into 4 and then 2 sections. It took a bit of trial and error, but I think the sizing turned out great.

I used a craft knife and cutting mat to cut the photos to size for the heart shaped plaques. I used scissors to cut the photos to size for the rectangular plaques.


Step 7 – Glue the photos onto the wooden plaque & seal them with Mod Podge
Glue your photos onto the wooden plaque. I glued one on each side.


After they feel reasonably secure, paint a layer of mod podge over the entire plaque. This will protect the photo and keep it in place.


I let the first layer dry, and then painted a layer on the other side. I ended up doing 3 layers. They dry quite quickly, so this didn’t take much time. The Mod Podge worked really well and provided a hard coating over the photo. I’m really happy about the results.
Step 8 – Attach the snaps
Next, attach the snaps to the bottom of the keychain.
Determine placement for the snaps. Make sure that they are low enough so that the keychain will be able to easily close, but high enough so that the snaps will be secure.
After you have determined placement, make a mark in the leather with the snap.
Then use the leather punch and a hammer or mallet to punch through the leather. I did the front and back flaps separately, but I think the punch would have gone through both at the same time.
Apply the snaps using your tools. The snaps you bought will likely come with instructions. This is how I applied mine:


Step 9 Attach the keyring and assemble the keychain


Thread the leather strap through one of the slits on the top. Pull it through the hole in the top of the plaque and then through the other slit in the leather. The good side of the strap should be visible on the inside of the keychain.


Fold the back piece of the strap over the front piece, with the keyring in the loop. You’ll have three layers of strap. You may need to trim the strap slightly if it’s too long.

Punch a hole with your leather punch through all three layers just below the loop the keyring is attached to.


Attach a rivet or another snap through the hole. I opted to use another snap because the rivets I bought were too long for the leather.


Admire Your Work!
Your mother’s day gift is complete! This keychain would be a great gift for anyone. You could customize the writing for a Father’s day gift too. Now all you need to do is wrap up this gift and give it.

Subscribe to See More
Subscribe to my email list to be notified every time I post. For more ideas, follow me on Instagram @the_walnut_grove and pin this image to Pinterest to refer back to.
Let’s Chat!
As always, thank you for the support! If you have any questions, comments, or suggestions, please leave them down below. I’d be happy to hear from you!

